I’m working on this mapping chart for MOTU Digital Performer and the Behringer BCF2000 controller and could use some help with a few of the items. Where this document currently says “Does Nothing” there almost surely are functions being performed that I simply am not aware of.
Capabilities Discovered So Far
Level Controls:
Volume sliders
Pans
Send Levels
Sends On/Off
A “FLIP” mode switching knobs with sliders
Selectors and Toggles:
Track Mutes
Track Selectors
Track Solo
Track Arm for Record
Metronome On/Off
Countoff On/Off
Overdub On/Off
Slave to External Sync On/Off
Link Playback
Link Selection To Memory
Pre-Roll and Post-Roll
Switch to Sequence Panel
Switch to Quickscribe
Switch to Mixer Panel
Toggles Clips window (intended for beneath Clippings panel)
Insert Marker
Opens Track Groups Panel
Creates Group that is added to the Track Groups Panel
Controls:
Play
Stop
Shuttle-play in forward and backwards direction
Start Recording on Record-Enabled Track(s)
Turn ON Auto-Record
Set Split Point (or Trim or Selection start point) at the play head position
Toggle between Snap-To-Grid and Free-form for all tools
Scroll Sequence View to start
Jump to end of the sequence
Move to BOTTOM of Sequence Panel
Move to TOP of Sequence Panel
Move leftwards or rightwards through the banks represented by the sliders
Move one-track-at-a time shifting to the left or right
Toggle Monitoring (Audible Mode) On/Off
Bring up top plugin editor for selected track
I am using the Mackie “Logic” emulation on the BCF2000 on a PC to test this. Just a quick note: When you are changing modes into Logic Mode [by holding down the third top button while powering up], watch the LCD and let go after you see “LC” right away — if you continue holding the button down you will go into “Global Edit” mode instead and nothing you expected to work will function. (That is, you will NOT be in Mackie Logic mode anymore. Here is some more information on the “Modes”.)
In the image, I’ve renamed a few of the button names.
Here is the image, with the knob and button assignments listed below. Click the image to view full-screen in a new tab.
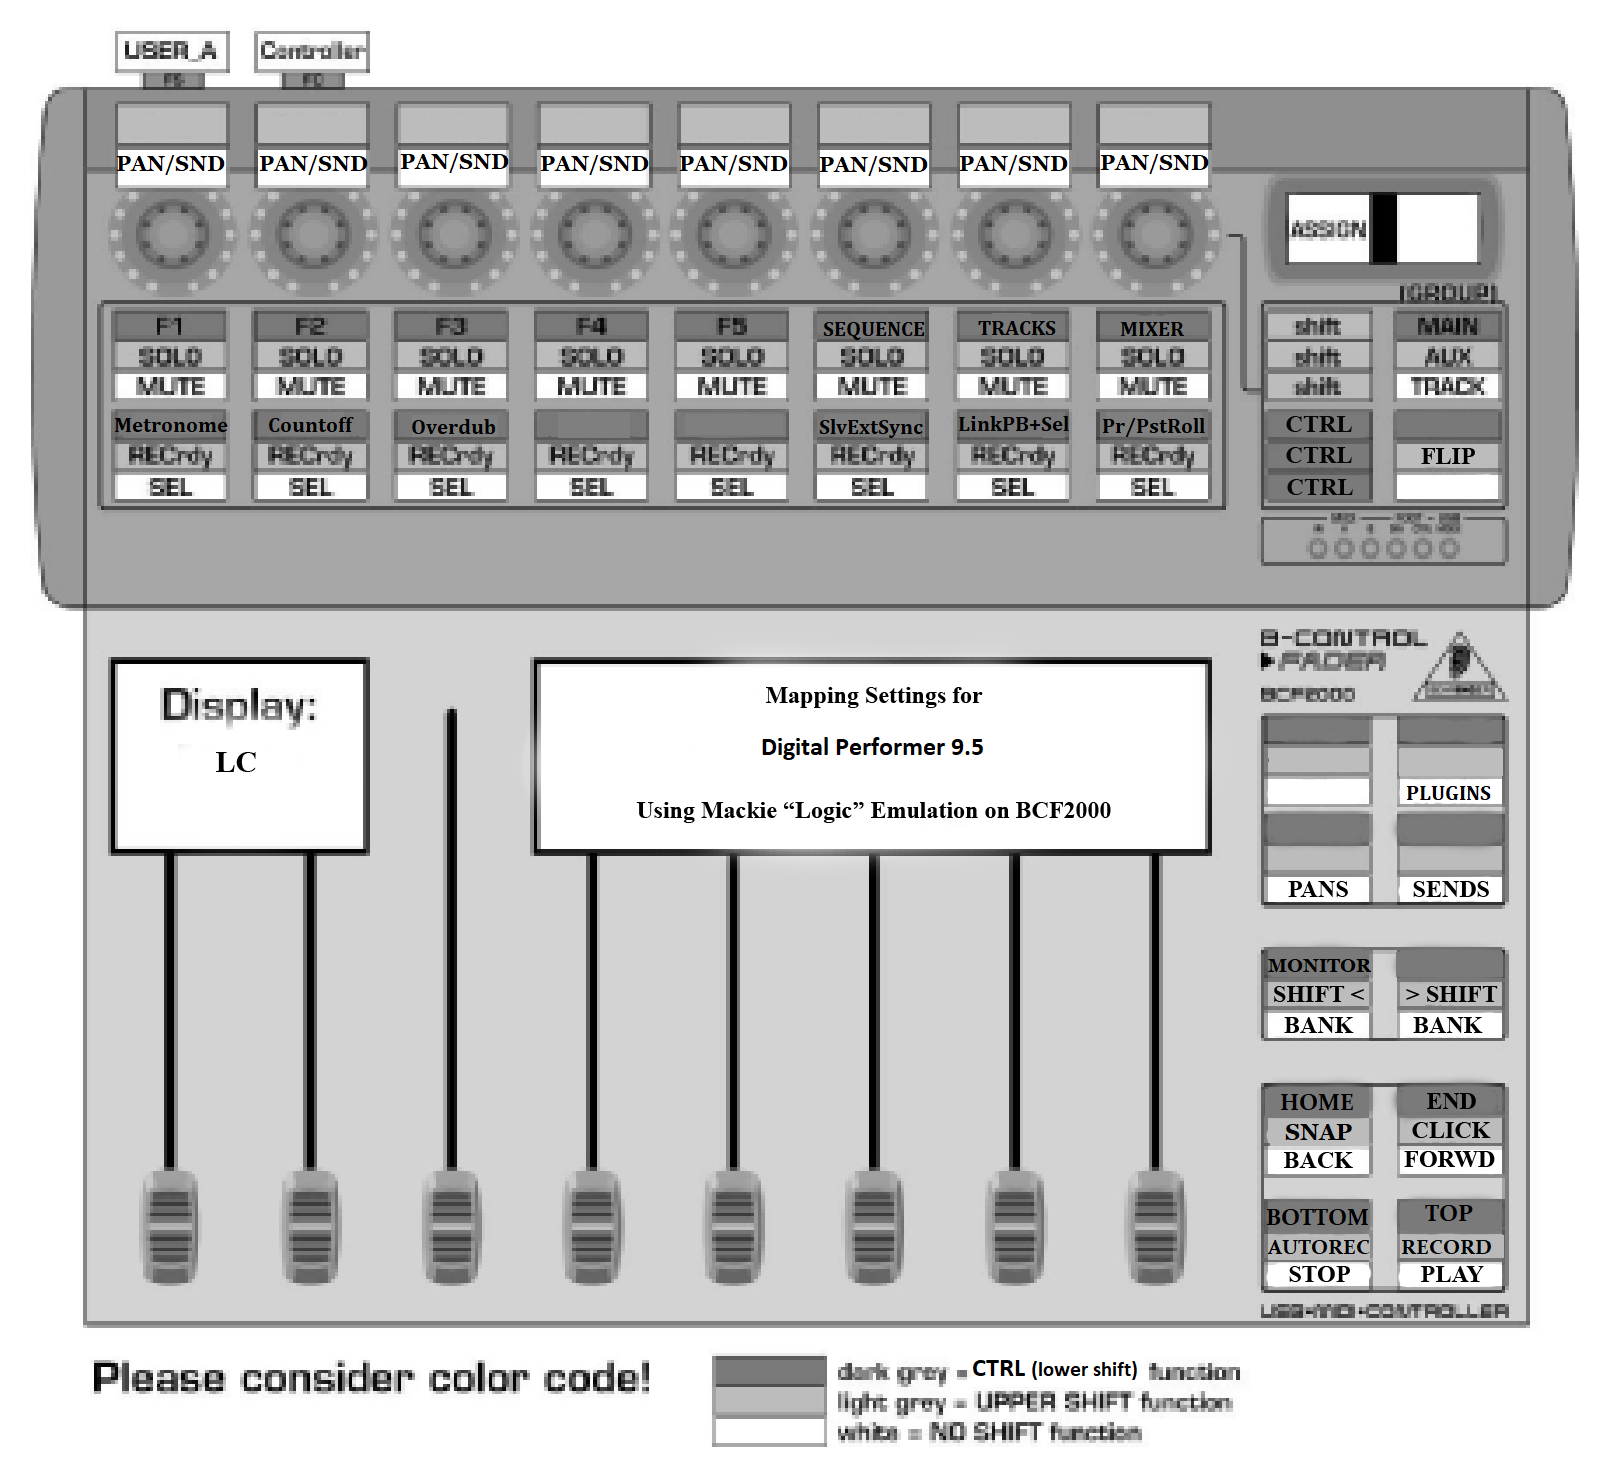
Download Link For Image – Right-click to download – Print in Landscape Mode
After starting up the BCF2000 in “LOGIC” mode and then starting Digital Performer, the default setup is to have the sliders control the mixer faders (you must have the mixer tab selected as the focus, that is, it must be clicked on) in banks of eight tracks at a time (move through banks using the “Preset” buttons I’ve renamed as “Bank” in the image); the knobs control the panning for each track and when pressed do nothing in this mode; the buttons just beneath the knobs are track mutes and the buttons just above the sliders are to select the track being worked on within the current bank (if you have the “Track Inspector” window open you’ll see it change according to which of these bottom-row buttons you press). All the text with white-backgrounds in the image are the defaults. Modify the action of the knobs and buttons by using the “Encoder Groups” top-left and bottom-left I’ve re-labeled in the image as SHIFT and CTRL. The Encoder Group button on the bottom-right is used with SHIFT as a FLIP button that switches the knob functions with the sliders.
——————————————————————
KNOBS
Three Knob modes – Edit, Exit, and Track with Learn.
Edit (renamed as the PANS button in the image above)
The default powerup mode
Assigns the Knobs to control PAN. Pressing down on this knob does nothing.
Exit (the SENDS button in image above)
Changes Knobs to affect DP’s Send levels
You can also press on a knob to enable/disable the associated track’s send.
Sliders still control the volume faders and all buttons follow normal conventions with their SHIFT or CTRL modifier keys.
Note:
Press “Flip” to allow controlling the send or pan settings with the sliders and the tracks’ volume with the knobs instead. (Press Upper-left “Shift” with lower right “Option” key – or following image labeling above, Shift-FLIP.)
Learn (PLUGINS in the image above)
See bottom of the post – I’d be careful with this one!
—————————————————————
BUTTONS
Buttons for each track:
Upper-Button Row are Mutes
Lower-Button Row Selects Track
Shift-Upper-Button Row are Solos
Shift-Lower-Button Row [RECrdy] arms track for recording
Toggles
CTRL plus the lower row of buttons toggles on/off various features of DP.
CTRL-Lower-Button-1 — Metronome On/Off
CTRL-Lower-Button-2 — Countoff On/Off
CTRL-Lower-Button-3 — Overdub On/Off
CTRL-Lower-Button-4 — Does Nothing
CTRL-Lower-Button-5 — Does Nothing
CTRL-Lower-Button-6 — Slave to External Sync On/Off (“Wait” if off)
CTRL-Lower-Button-7 — With Slave to External Sync off, Link Playback and Link Selection To Memory are toggled On/Off
With Slave to External Sync on, only Link Selection to Memory is toggled.
CTRL-Lower-Button-8 — With above selected, enables/disables Pre-Roll and Post-Roll in the toolbar.)
–> Occasionally, toggling off Link Playback and Link Selection To Memory using the CTRL-7 key will switch to Auto-Stop and/or Auto-Rewind being toggled on. The only way to turn them off after that happens is by clicking them, it appears.
View Tabs
CTRL with various upper-row buttons switches tabs.
CTRL-Upper-Button 1: Opens Sequence Panel
CTRL-Upper-Button 2: Opens Quickscribe
CTRL-Upper-Button 3: Opens Mixing Board
CTRL-Upper-Button 4: Toggles Clip Settings Window beneath current window (intended for Clip window pairing).
CTRL-Upper-Button 5: Insert Marker
CTRL-Upper-Button 6: Opens Track Groups Window
CTRL-Upper-Button 7: Creates Group that is added to above Track Groups Window
CTRL-Upper-Button 8: Unknown as of this writing
If coming from the Tracks Panel to the Mixer Panel, only the track previously selected as the focused track will appear. Pressing “Preset Left” or “Preset Right” (the bank switch buttons) brings all the desired sliders back into view. This is not an issue when returning to the Mixer from the Sequence Panel. However, in DP 11.3 being tested today, the left-preset button suddenly now offsets by 7, forcing the first slider to be slider 8, and the next preset to begin with slider 2. It works fine upon initial loading, and is only offset if you touch the preset L/R buttons.
Bottom-Right four buttons: (See Image Above)
PLAY does just that, and
STOP stops.
FORWRD shuttle-plays in forward direction. Tapping second time speeds up playback.
BACK shuttle-plays in reverse direction. Tapping second time speeds up reverse playback
Shift-PLAY Starts Recording on Record-Enabled Track(s) IMMEDIATELY from the playhead position.
Shift-STOP Turns ON Auto-Record (does not turn it off).
Shift-FORWRD Sets Split Point (or Trim or Selection start point) at the play head position. If no tracks (or the conductor track only) are selected, it selects all and marks all tracks. Otherwise, it only applies to the selected tracks. You still need to perform the split (CTRL-Y) or Trim (Win-U) or shift-click using the I-beam to complete a selection.
Shift-BACK Toggles Snap-To-Grid and Free-form for all tools. Especially useful for the I-Beam (which becomes “whiter” in the Free-form mode).
CTRL-BACK Scrolls Sequence View to start. (labeled HOME – Does not affect Playhead position)
CTRL-FORWRD jumps to end of the sequence. (labeled END – Does not affect Playhead position.)
CTRL-STOP moves to BOTTOM of Sequence Panel
CTRL-PLAY moves to TOP of Sequence Panel
PRESET/BANK Buttons (Relabeled as “BANK” – See Image Above)
PRESET-LEFT moves leftwards through the banks represented by the sliders
PRESET-RIGHT moves rightwards through the banks represented by the sliders
SHIFT-PRESET-LEFT moves one-track-at-a time shifting to the left.
SHIFT-PRESET-RIGHT moves one-track-at-a time shifting to the right.
CTRL-PRESET-Left Toggles Monitoring (Audible Mode) On/Off.
CTRL-PRESET-Right Does Nothing
A couple odd ones:
Pressing the upper-right encoder group button and “Learn” at the same time brings up the topmost plugin editor window for the selected track (you seem to need to have closed all open plugin windows first for this to work). Be super careful when the “Learn” button is selected. Turning a knob seems to make it get “creative” inserting plugins into the selected track with no apparent rhyme nor reason. Turning it VERY slowly you can see it moves to the next preset about ten seconds after you’ve moved the knob. I’d avoid this one other than to bring up the top plugin edit window.
—————————————————————————–
Please let me know of additions or corrections to this document and I will keep this first post and the image updated.
Terry