I’m working on this mapping chart for Mixbus and Mixbus 32-C (version 4 & 8) and the Behringer BCF2000 controller and could use some help with a few of the items.
I am using the Mackie “Logic” emulation on the BCF2000 on a PC to test this. Just a quick note: When you are changing modes into Logic Mode by holding down the third top button while powering up, watch the LCD and let go after you see “LC” right away — if you continue holding the button down you will go into “Global Edit” mode instead and nothing you expected to work will function. (That is, you will NOT be in Mackie Logic mode anymore.)
I’ve renamed a few of the names used in the manual, like changing “Cycle” to “Loop” for the button that turns a region into a loop and engages loop playback, and for “Enter” (now “Sel-All”) and “Replace” (now Reg-End, though I cannot find how to do the region beginning, as I cannot find the equivalent “Drop” button). Instead of “CH >>” and “CH < <” I have “Shift <” and “> Shift” for shifting the sliders; and “CR Up” and “CR Down” are now “Next” and “Prev”, since they cycle through the tracks.
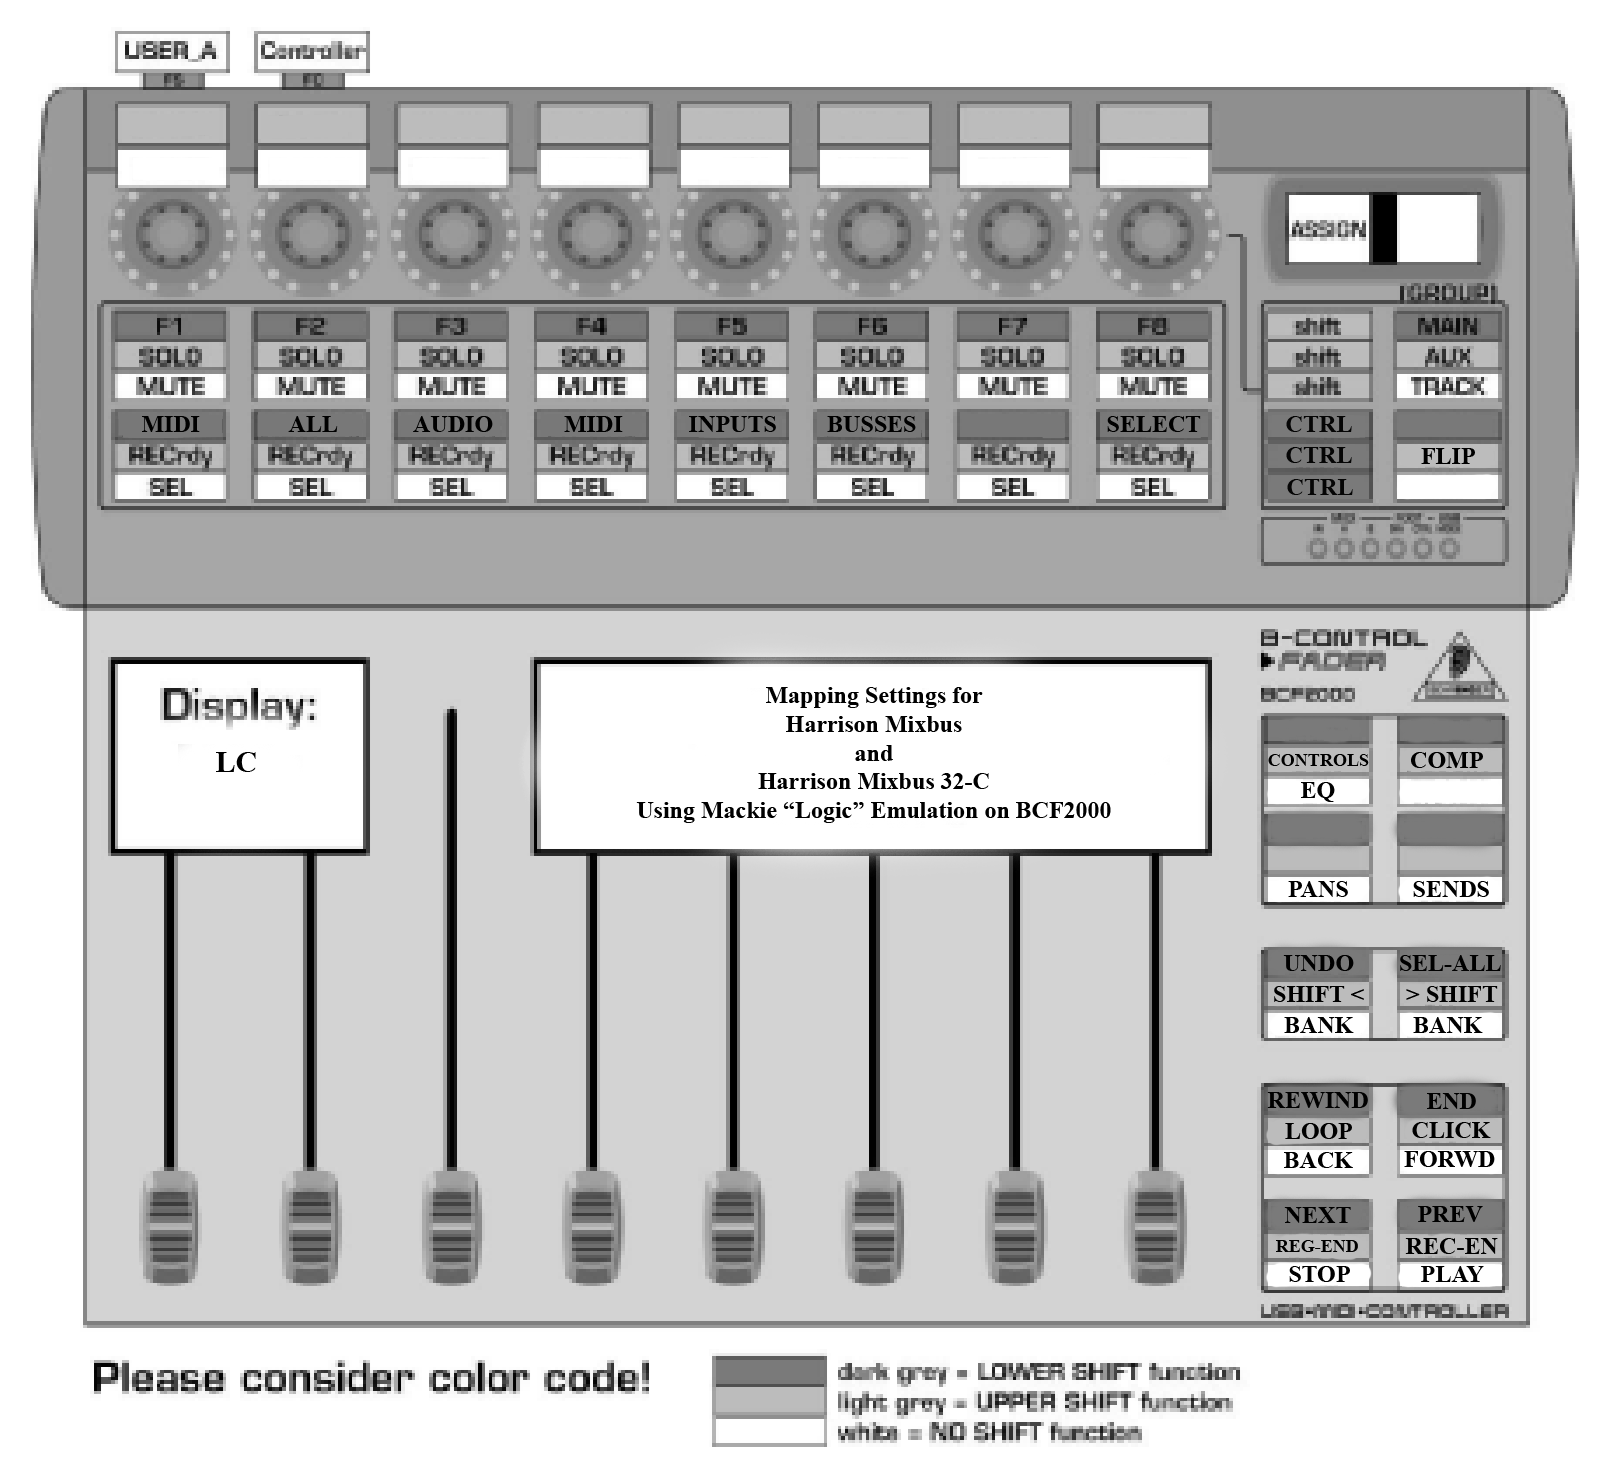
Here is the image, with the knob and button assignments listed below. (Click image to see full-size in new tab.)
Download Link For Image – Right-click to download – Print in Landscape Mode
Five modes – Edit, Shift-Store, Store, Exit and Shift-Learn.
These only become available after selecting a track via the second row of buttons beneath the knobs (without any modifier). The row above that are mute buttons. (Refer to image…)
Edit (default) (the PANS button in image above)
Assigns Knobs to control PAN. Pressing knob enables/disables send to Master.
Shift-Learn (Shift-COMP in image above)
Knobs control compressor settings.
Knob-1 — Threshold
Knob-2 — Ratio
Knob-3 — Type
Knob-4 — Makeup Gain
Knob-5 — Compressor On/Off
Knob-6 — Low Cut Freq
Knob-7 — High Cut Freq
Knob-8 — Hi/Lo Filters on/off
Store (the EQ button in image above)
Knobs control EQ Parameters from bottom up
Exit (the SENDS button in image above)
Changes Knobs to affect Mixbus Send levels
Press knob to enable/disable associated send.
Note:
Press “Flip” (Upper-left “Shift” with lower right “Option” key – or by image above, Shift-FLIP) to allow instead controlling the send levels with the sliders and the tracks’ volume with the knobs.
Shift-Store (Shift-CONTROLS in image above)
Controls the input/output and solo routing
Knob-1 — Not sure what it does!
Knob-2 — Input/output (Sweeps through Non/In/Disk/Both – turn slowly!)
Knob-3 — Solo Isolate toggle (ISO light at top of track)
Knob-4 — Solo Safe (Locked) toggle
Knob-5 — In V4, lights up blue dot at top of channel strip – no idea what it is for!
Buttons for each track:
Upper-Button Row are Mutes
Shift-Upper-Button Row are Solos
Lower-Button Row Selects/Deselects Track
Shift-Lower-Button Row arms track for recording and switches to monitoring Input rather than Post-Fader
Bottom-Right four buttons: (See Image Above)
PLAY does just that, and STOP stops.
BACK shuttle-plays in reverse. Multiple taps speed up playback
FORWRD shuttle-plays forward. Multiple taps speed up playback.
Shift-PLAY enables all armed tracks for recording upon pressing PLAY.
Shift-FORWRD turns metronome click on/off
Shift-STOP sets “region-end” at playhead position
Shift-BACK turns on looping for a selected region.
CTRL-BACK returns play head to start. (REWIND)
CTRL-FORWRD jumps to end of file. (FF)
CTRL-STOP moves to/selects NEXT track
CTRL-PLAY moves to/selects PREVious track
Bank Buttons (See Image Above)
CTRL-BANK-Up selects all.
CTRL-BANK-Down is supposed to be “Undo” but I’ve not seen it work yet.
VIEWS
(Portions excerpted from the Mixbus manual):
CTRL plus the lower row of buttons takes you to different “Views” of the sliders.
CTRL-Lower-Button-1 — MIDI Tracks: this shows only the MIDI (instrument) tracks on the surface. Audio tracks and buses will be skipped over, if you adjust the Channel or Bank buttons.
CTRL-Lower-Button-2 — Global View (ALL): this resets the view to showing channels in sequential order, with the first available mixer channel on the far left of the surface.
CTRL-Lower-Button-3 — AUDIO Tracks: this shows only the Audio tracks on the control surfaces. Midi tracks and buses will be skipped over, if you adjust the Channel or Bank buttons.
CTRL-Lower-Button-4 — Audio Inst (MIDI): This operates the same as MIDI Tracks button.
CTRL-Lower-Button-5 — INPUTS: This shows “buses” that were created with the New Track dialog. Buses are often used as live inputs to the mixer. MIDI tracks, audio tracks, and mixbuses will be skipped over, if you adjust the Channel or Bank buttons.
CTRL-Lower-Button-6 — BUSSES: This shows the mix buses.
CTRL-Lower-Button-7 — Outputs: Currently unimplemented; this will show the Click (metronome), Auditioner (solo bus), and Monitor buses in the future.
CTRL-Lower-Button-8 — User (SELECT): This shows the first 8 channels that are “selected” in the mixer GUI. This allows you to select a discontiguous collection of channels, and control them side-by-side on the control surface.
—————————————————————————–
Need to find out what is the button for “Drop” for the region selection options to be useful.
Please let me know of additions or corrections to this document and I will keep this first post updated.
Terry
One response to “Behringer BCF2000 Mixbus 4-8 Mackie Mode (LC) Controller MAPPINGS”
Thanks Terry, I have used this page as a reference a few times over the past couple of years and have just done so again. I have two BCFs which I dismantled and bolted together to create one unit—originally one white and one blue, but in dismantling and reassembling I created a chequered pattern. Not to everyone’s taste, but I like it.
I personally like the sound of Logic but being able to control both sends and eq directly from the mixer view (on 4k monitor) with the BCFs is fantastic and keeps me coming back to Mixbus (now on version 8).
Thanks again,
Bill